4-Hour Range Breakout Scalping: A 5-Minute Re-Entry Framework

JustWolves is an educational platform and is not a SEBI-registered investment advisor. Trading financial instruments involves significant risk of loss and may not be suitable for all investors. Past performance is not indicative of future results. Read our full disclaimer →
In this article · 15 sections
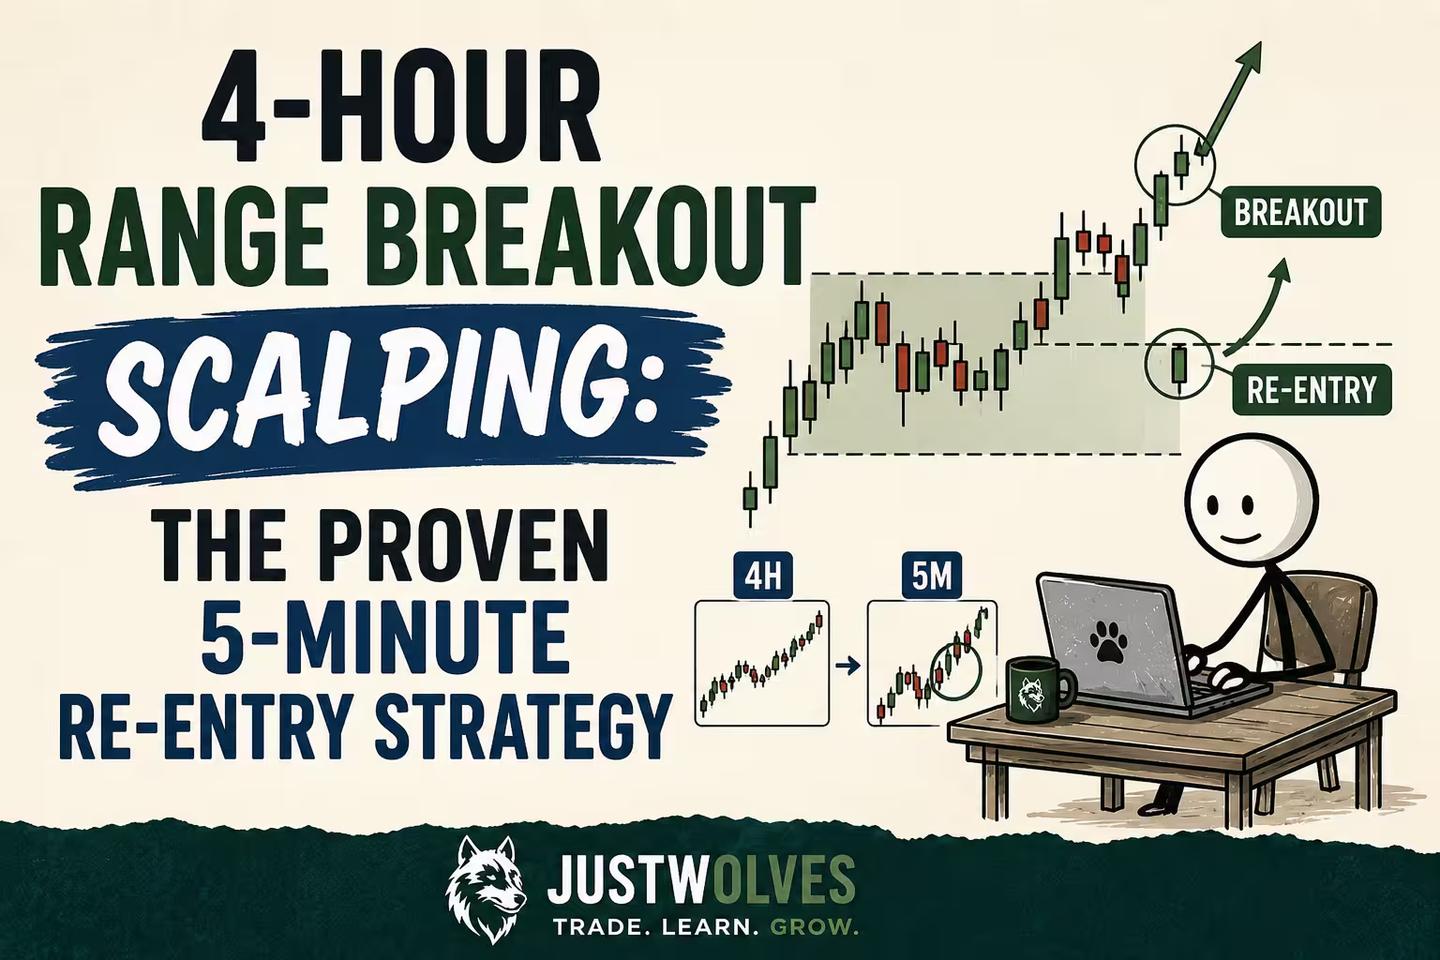
What if you could define your entire trading framework for the day with a single candle — before the first trade is even considered? That is exactly what the 4-hour range breakout strategy does. The first four-hour candle of the day (New York time) establishes a high and a low. Every trade for the rest of the day is either a long or a short based on how price interacts with those two levels. No trend analysis. No complex indicators. Just a three-step checklist, which we test on real crypto, forex, gold and index prices below.
The Core Idea: One Candle, All Day
Traditional traders spend hours each morning analysing trends, drawing structures, and determining bias. The 4-hour range approach does none of this. Instead, it asks one question: where is the reference range for today?
The answer is the first four-hour candle of the trading day (based on New York time). This candle captures the initial institutional positioning of the session. Its high and low represent the range within which the market decided to trade during the first four hours. When price later breaks outside this range on a smaller timeframe, it is making a directional statement. When that breakout reverses and price comes back inside, it is providing a precise, rule-based entry.
The strategy is trend-agnostic: it does not require knowing whether the broader market is bullish or bearish. It exploits the natural behaviour of price to break out of consolidation zones and then return to test them before continuing.
Rule 1: Mark the 4-Hour Range
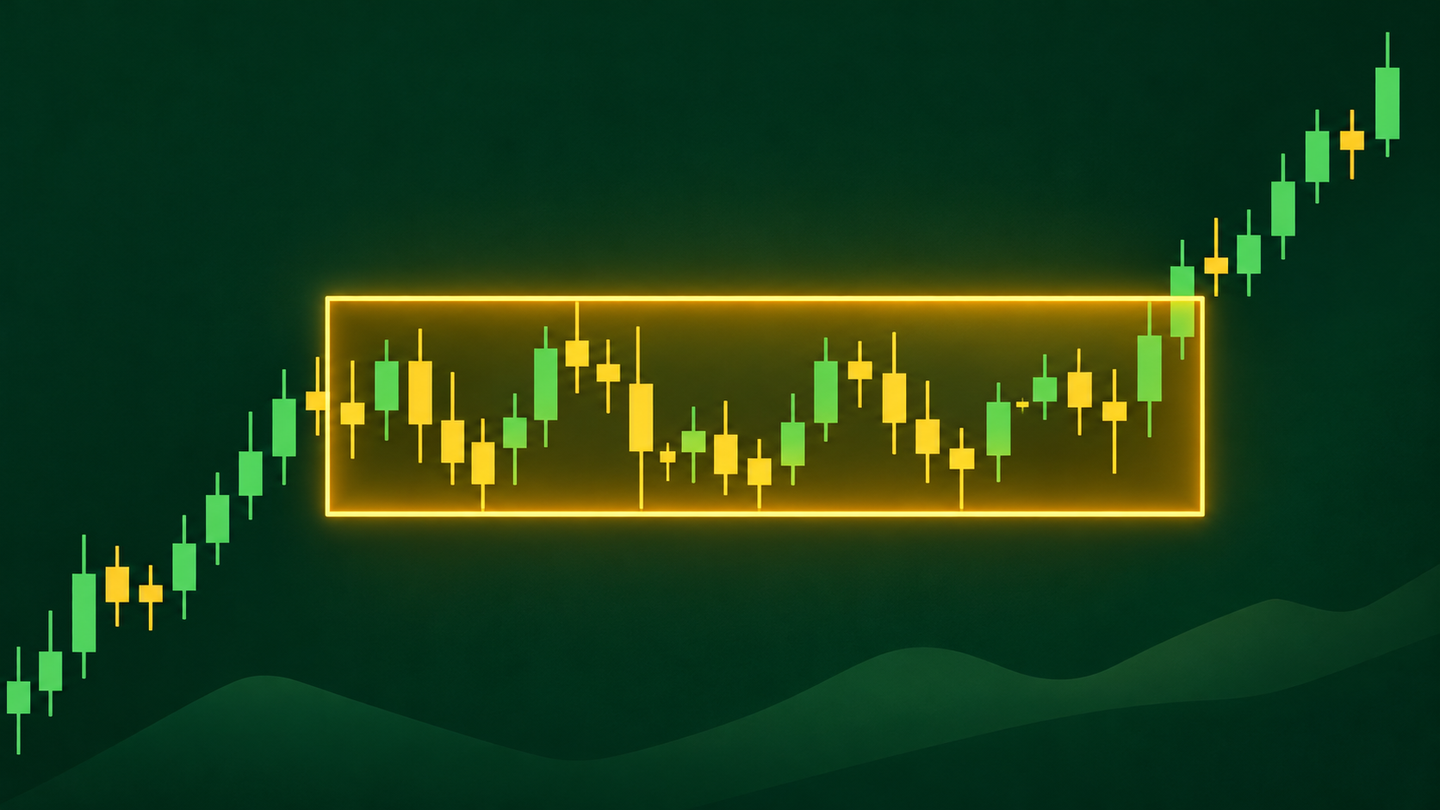
Open your charting platform. Select the asset you want to trade. Set the timeframe to 4 hours. Critically: go to the timezone setting in the bottom-right corner of the chart and select New York time. This is essential — the first 4-hour candle must be based on New York time, not your local timezone.
Identify the first 4-hour candle that formed on the current date. For example, if today is a Monday in New York time, the first 4-hour candle starts at midnight New York time (00:00 ET) and closes at 04:00 ET. Wait for this candle to fully close before marking the range — never mark a candle that is still forming.
Draw a horizontal line at the high of this completed candle. Draw a second horizontal line at the low. Extend both lines to the right edge of the chart. These are your 4-hour range levels for the entire trading day.
Setting Up the 4-Hour Range
Any platform
Charting platform: any platform that lets you set the chart's time zone
NY Time Zone
Must select New York time in the chart's time zone settings
Fully Closed
Only mark the range when the first 4H candle has fully closed — never on a live candle
Rule 2: Wait for the 5-Minute Breakout
Switch to the 5-minute chart. Now watch price interact with your two range levels. You are looking for a specific event: a 5-minute candle that closes outside the range — either above the range high (bullish breakout) or below the range low (bearish breakdown).
The key rule: wicks do not count. Only a full candle BODY CLOSE outside the range is a valid breakout signal. If the wick extends above the range high but the candle body closes back inside, that is a rejection — not a breakout. Strict adherence to this rule filters out the vast majority of false signals.
A valid breakout is when a 5-minute candle closes clearly above the range high (with the full body outside the range) or clearly below the range low. This is your confirmation that a directional move is underway.
Rule 3: Take the 5-Minute Re-Entry
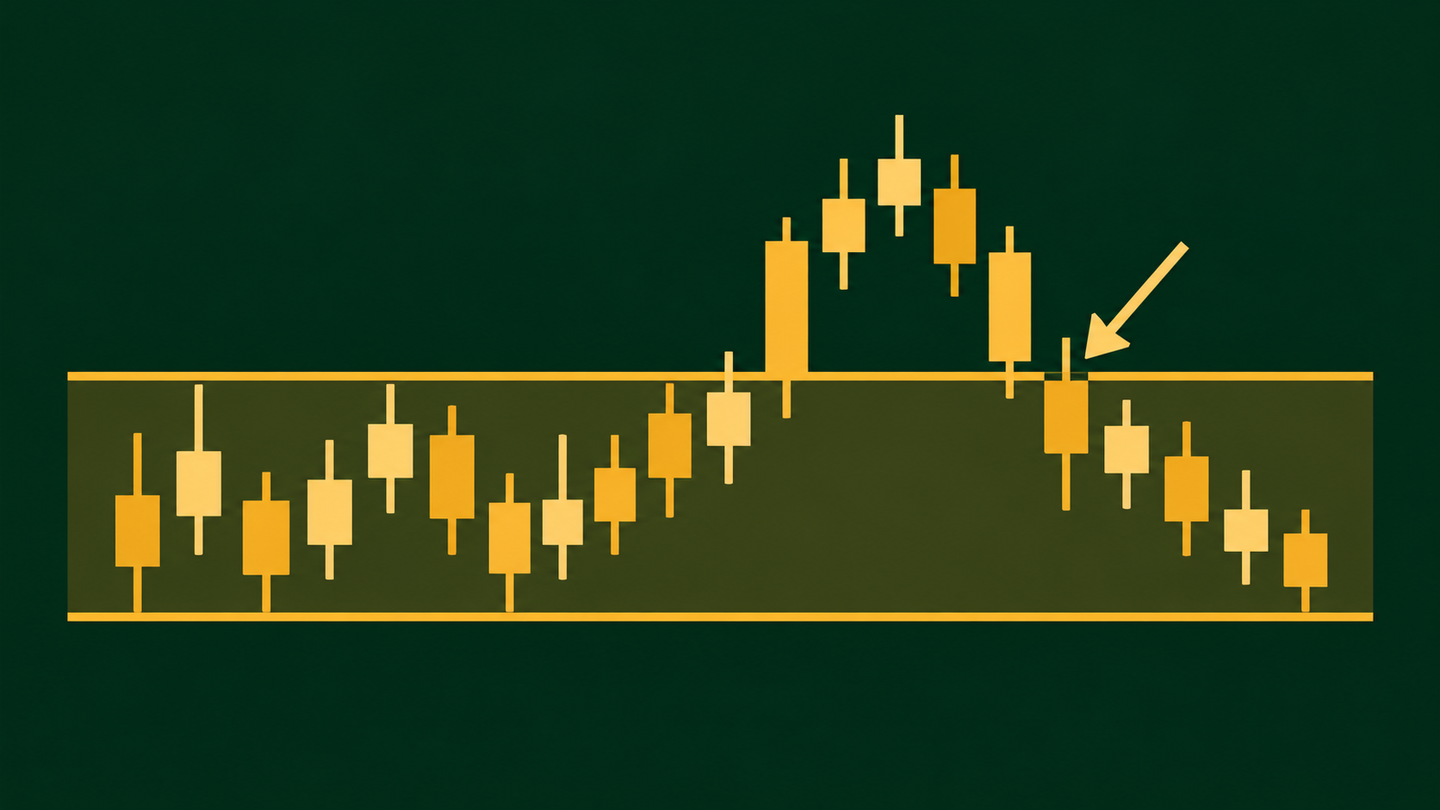
After a valid breakout (5-minute candle closing outside the range), you do not enter immediately. You wait. Specifically, you wait for price to re-enter the range — a 5-minute candle that closes back INSIDE the range after the breakout.
This re-entry is the actual trade trigger. When price breaks above the range high and then closes back below it, the breakout has failed — and that failed breakout is your entry signal in the opposite direction (short). When price breaks below the range low and then closes back above it, the breakdown has failed — and that is your long entry signal.
This counter-move entry has a specific logic: the failed breakout trapped retail traders who entered on the break. Those trapped traders' stop-losses fuel the reversal move inside the range. You are entering on the side of the reversal, with the trapped breakout buyers/sellers providing the momentum.
Important constraint: the breakout and re-entry must happen on the same trading day as the 4-hour range you marked. Do not carry setups from one day to the next.
The re-entry is more powerful than the breakout. When price returns inside the range after a clear break, trapped traders get stopped out and that order flow drives the reversal. You are entering with the institutional flush, not against it.
Entry, Stop-Loss and Target Rules
Trade Execution Rules
Step 1: Entry: close of the re-entry candle
For a short setup (price broke above range high and returned inside): enter at the close of the first 5-minute candle that closes back below the range high. For a long setup (price broke below range low and returned inside): enter at the close of the first 5-minute candle that closes back above the range low.
Tip: Use a limit order at the projected re-entry candle close level if you can predict it, or a market order at the actual close. Avoid entering mid-candle — wait for the body to confirm.
Step 2: Stop-Loss: exact high/low of the breakout move
For shorts: place stop-loss at the exact highest wick of the breakout candle. For longs: place stop-loss at the exact lowest wick of the breakdown candle. The stop goes at the extreme of the failed breakout — the point that would invalidate the re-entry thesis.
Tip: If the breakout candle was unusually large, use the nearest key support or resistance level instead of the breakout extreme. Oversized stops reduce R:R significantly.
Step 3: Take-Profit: 2× the stop-loss distance
Measure from entry to stop-loss. Double that distance. Set your take-profit at 2× the stop distance in the direction of the re-entry. This ensures every winning trade produces twice the gain of every losing trade.
Step 4: Multiple entries on the same day
If the first setup resolves (either stop or target) and another valid breakout-re-entry sequence forms later in the same day, you can take a second trade. The range levels remain valid for the entire day. Apply the same rules — another valid breakout (body close outside range) followed by re-entry (body close back inside range).
Real Prices: A Day the Re-Entry Failed
The chart below applies the rules to real gold futures prices on 14 October 2026: a clean 4-hour range, three valid re-entries in a row, and three losses as the market broke down.
Real prices: three re-entries and three losses on gold futures, 14 October 2026
Step 1 of 4
The 4-hour range
The first 4-hour candle of 14 October 2026, midnight to 4 am New York time, sets a range on gold futures from 4,165.5 to 4,190.4.
- What to observe
- Rule 1 of this article: two levels for the whole day.
- Condition
- Now wait for a close outside, then a close back inside.
When the Re-Entry Setup Fails
The re-entry is the trigger, not the breakout itself, which means the setup is invalid more often than it is valid. If price breaks the 4-hour range and keeps trending without ever closing a 5-minute candle back inside the range, there is no re-entry to take — a strong trend day simply does not produce this setup, and chasing the breakout directly abandons the strategy's edge.
It is also invalid if, after re-entering the range, price immediately breaks through the opposite side before a position is opened. That signals the range has failed entirely rather than produced a clean re-entry — the correct response is to stand aside until the next 4-hour range forms.
Why This Approach Works
The 4-hour range represents genuine institutional activity during the first session period. It is not an arbitrary level — it is where the market actually traded for four hours. The high and low of this range are therefore meaningful to institutional algorithms and large players who use the same timeframe references.
When price breaks and returns into this range, two powerful forces converge. First, the trapped breakout traders are being stopped out, providing exit liquidity for the reversal. Second, the range boundary acts as a magnetic support/resistance level — institutions that were active during the 4-hour formation period use it as a reference for new entries.
The 5-minute timeframe filters noise while remaining fast enough to capture intraday moves. The body-close rule for both the breakout and the re-entry ensures you are reacting to confirmed, completed price action — not anticipating moves or reacting to wicks.
Results on Bitcoin: Our Test
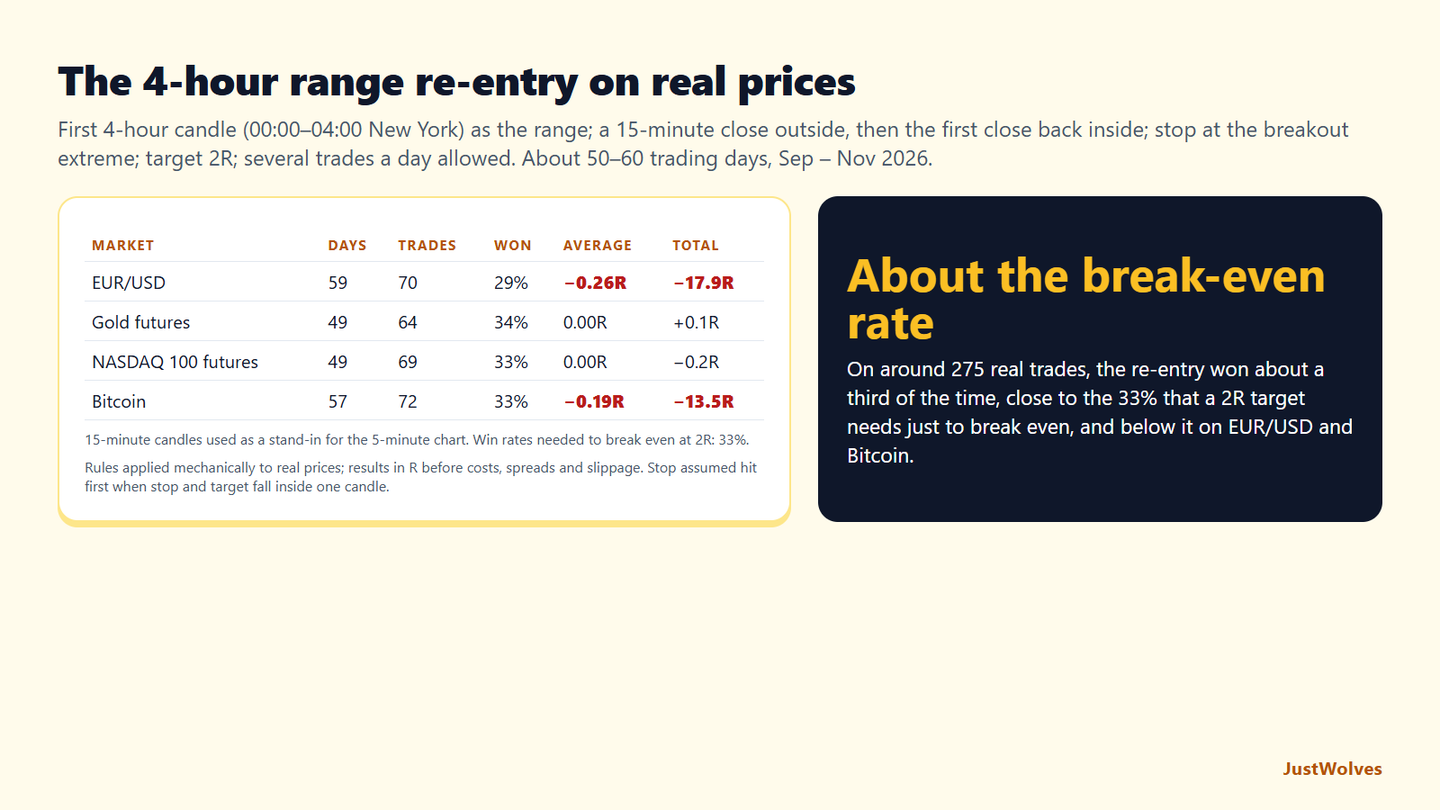
JustWolves applied this article's rules to real Bitcoin prices for 57 days, September to November 2026: the first 4-hour New York candle as the range; a close outside it, then the first close back inside; entry at that close; stop at the extreme of the breakout move; target 2R; further trades allowed later in the day. We used 15-minute candles as a stand-in for the 5-minute chart. Bitcoin re-entries won a third of the time, just at the break-even rate for 2R, and lost 0.19R per trade on average. Strong one-directional days produced repeated false re-entries, as in the gold example above.
| Measure | Result |
|---|---|
| Trading days tested | 57 |
| Trades | 72 |
| Won (2R target) | 24 (33%) |
| Average per trade | −0.19R |
| Total | −13.5R |
Results on EUR/USD: Our Test
On real EUR/USD prices for 59 days, the same rules produced 70 trades. They won 29% of the time, below the 33% a 2R target needs, and averaged −0.26R per trade, the weakest of the four markets we tested. Re-entries often failed when the London or New York session pushed price steadily through the range boundary.
| Measure | Result |
|---|---|
| Trading days tested | 59 |
| Trades | 70 |
| Won (2R target) | 20 (29%) |
| Average per trade | −0.26R |
| Total | −17.9R |
Results on Gold: Our Test
On gold futures for 49 days, the rules produced 64 trades. They won 34% of the time and broke exactly even, +0.1R in total. NASDAQ 100 futures, tested the same way over 49 days, gave almost the same result: 69 trades, 33% won, −0.2R in total. Gold was the most active market, with several days producing three or more re-entries, as in the 14 October chart above.
| Measure | Result |
|---|---|
| Trading days tested | 49 |
| Trades | 64 |
| Won (2R target) | 22 (34%) |
| Average per trade | 0.00R |
| Total | +0.1R |
Multiple Setups in a Single Day
One of the advantages of this strategy is that it can produce more than one valid trade per day. After the first setup resolves (stop or target), if another breakout-re-entry sequence forms later in the same day, it qualifies as a second trade using the same 4-hour range levels.
The constraint: all trades must occur within the same trading day as the marked 4-hour range. At the end of the session, the old range is retired. The next day, a new first 4-hour candle forms a new range — a completely fresh framework with no carry-over from the previous day.
Do not force a second trade if the re-entry does not appear clearly. One clean trade per day, executed well, outperforms two mediocre trades every time.
How to Handle Large Breakout Candles
Occasionally, the breakout candle will be significantly larger than usual — caused by a news event, a strong momentum push, or a gap. Placing the stop at the extreme of a very large candle creates a wide stop that produces a small position size and reduces the overall R:R quality.
In these cases, use the nearest key level instead of the breakout extreme. If price breaks above the range high by 50 pips and the breakout candle is huge, look for the nearest resistance level — a swing high, an order block, or a round number — above the range high. Place the stop there instead. This keeps the stop distance reasonable while still protecting against the thesis being invalidated.
The take-profit is still set at 2× the adjusted stop distance from entry. The setup is still valid — only the stop reference changes.
Position Sizing and Risk Controls
The 4-hour range strategy is designed for scalpers — traders who want to be in and out of positions within the same session. Risk per trade: 1% of total account equity. This ensures that even on a losing day with two losses, only 2% of capital is drawn down.
Position sizing formula: (Account equity × 0.01) ÷ stop distance in quote currency = maximum lot size. Use the Pip Calculator at justwolves.in/tools/pip-calculator to convert stop distance in pips to dollar value for exact sizing.
Never add to a losing position. If the first trade of the day is a loss, the second trade uses the same 1% risk calculation — not an increased size to recover. Scaling up after losses is how traders turn small setbacks into account-ending drawdowns.
Risk Management Parameters
1%
Maximum account risk per trade — absolute rule
2:1
Minimum R:R ratio before entering any position
Same day
All setups must be taken within the same session as the range
The 4-Hour Range Checklist
4-Hour Range Breakout Strategy — Summary
- Mark the high and low of the first 4-hour candle of the day (New York time) — these are your only reference levels
- Always wait for the first 4H candle to fully close before marking — never mark a live, still-forming candle
- Switch to 5-minute chart; wait for a candle BODY CLOSE outside the range — wicks do not count
- After a valid breakout (body close outside range), wait for a re-entry (body close back inside range)
- The re-entry is your entry signal: short after a failed breakout above range high, long after a failed breakdown below range low
- Stop-loss: exact high of the breakout candle (for shorts) / exact low (for longs) — use nearest key level if the candle is oversized
- Take-profit: 2× the stop distance in the direction of the re-entry
- All setups must occur on the same day as the range that was marked — start fresh each day with a new range
- Our test on about 50–60 real days per market: win rates of 29–34% with a 2R target, from −0.26R to 0.00R per trade before costs
- Risk 1% of account per trade — never add to losing positions or increase size after a loss
Frequently Asked Questions
Which time zone should I use for the first 4-hour candle?
New York time. In your chart's time zone settings, select New York (EST/EDT). The first 4-hour candle of the day begins at midnight New York time (00:00 ET). Wait for this candle to fully close (at 04:00 ET) before marking its high and low.
Can I take a trade if only the wick goes outside the range, not the body?
No. The rules require a candle BODY close outside the range for a valid breakout. A wick that touches or crosses the range boundary but closes back inside is a rejection or a false breakout — not a valid signal. Strictly requiring body closes filters out much of the noise.
What happens if there is a large gap at the open that immediately puts price outside the range?
A gap at the open that places price outside the 4-hour range counts as a potential breakout if the first 5-minute candle closes outside the range. Wait for that first candle to close to confirm. Then wait for the re-entry. Treat gaps with the large-breakout adjustment — use the nearest key level for the stop if the gap was unusually large.
Can I combine this strategy with trend filters?
Yes. Adding a simple trend filter — for example, only taking long re-entries when the daily candle is bullish (closing higher than it opened) and short re-entries when bearish — can improve the win rate further. This is described as combining with "other concepts like price action or trends" to "instantly boost performance." Start with the base rules first; add filters only after you have a solid baseline of results.
How long does each trade typically take to reach the target?
Highly variable. Scalp trades from the 4-hour range re-entry can reach the 2R target in minutes on high-momentum days or take 1–3 hours on slower days. Set your take-profit level and stop-loss as hard orders immediately upon entry, then let the market work. Do not time the trade — let the levels do the work.
What win rate does the 4-hour range re-entry strategy have?
In our test on real prices from September to November 2026, about a third of re-entries reached a 2R target: 29% on EUR/USD, 33% on Bitcoin and NASDAQ 100 futures, and 34% on gold futures, for results between −0.26R and 0.00R per trade before costs.
When does the 4-hour range re-entry fail?
Mostly on strong trend days. When price breaks the range and keeps going, each close back inside can be followed by another break, producing several losses in a row, as on gold futures on 14 October 2026.
Topics