
CRT Entry Models
JustWolves is an educational platform and is not a SEBI-registered investment advisor. Trading financial instruments involves significant risk of loss and may not be suitable for all investors. Past performance is not indicative of future results. Read our full disclaimer →
What you'll learn
- Entry at C3's open is simple and never misses a fast move, but has the widest stop relative to the target
- A retest entry at the swept level offers a better price but can be missed
- A lower-timeframe trigger gives the tightest stop and the most missed trades
- A midpoint pullback entry sits between the two in price and fill rate
- Choose one model, test it, and use it consistently
In this article · 15 sections
Once C2 has closed as a valid sweep, the question becomes how to get in. There are several reasonable ways, each trading off price, stop size and the chance of missing the move. This lesson compares four entry models for CRT so you can choose one deliberately and test it, rather than switching between them from trade to trade.
What You Will Learn
- Four CRT entry models
- The trade-offs between them
- How each affects stop placement
- How to choose and test one
Before You Start
Read CRT Strategy first.
The Four Models
| Model | Entry | Stop | Strengths | Weaknesses |
|---|---|---|---|---|
| C3 open | At C3's open, immediately after C2 closes | Below C2's low | Simple; never misses | Widest stop; worst price |
| Retest | Limit order at or just above CRL | Below C2's low | Better price | Missed if no retest |
| Midpoint pullback | Limit order near the midpoint of C2's range or C1's lower half | Below C2's low | Balance of price and fill | Some misses |
| LTF trigger | After a lower-timeframe break of structure or FVG | Below the LTF swing | Tightest stop | Most misses; more complexity |
Compare the Entries Step by Step
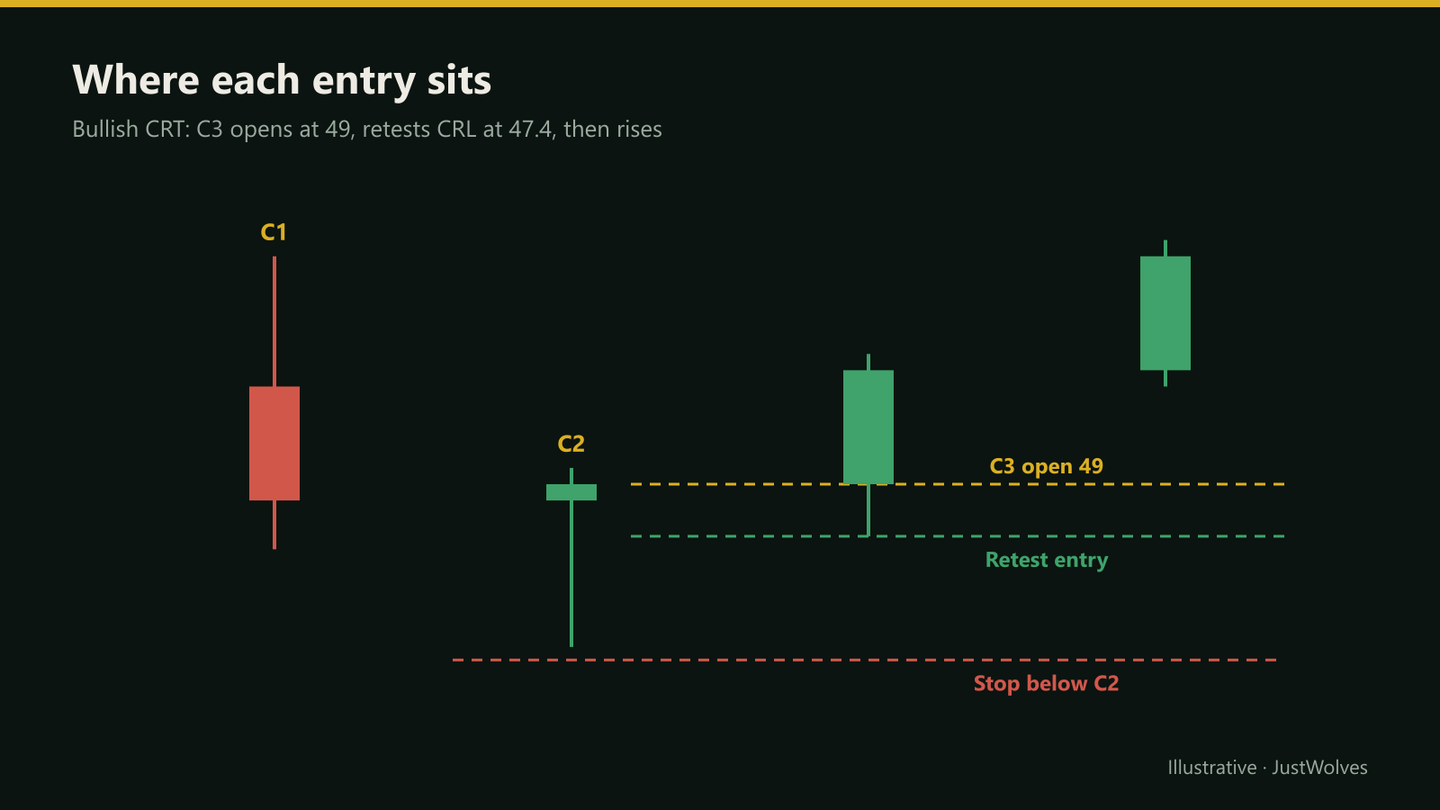
The chart below runs one CRT setup and marks the three limit-or-market entries on it. The stop and target are identical for all three, so the only thing that changes is the entry price, and with it the reward-to-risk.
One CRT setup, three entry models
Step 1 of 5
C1 sets the range
After a fall, C1 ranges from 47.00 (CRL) to 56.00 (CRH).
- What to observe
- A wide C1 gives room for the trade.
- Condition
- Mark CRH and CRL.
Comparing Reward-to-Risk
Using the chart: with a stop at 43.6 and a target at CRH 56, an entry at C3's open (49) risks 5.4 to make 7, about 1.3R. An entry on the retest (47.4) risks 3.8 to make 8.6, about 2.3R.
The retest is clearly better when it fills. The question is how often it fills in your market, and whether the trades it misses are the best ones. Only your own records can answer that.
What Happened When We Tested Them
JustWolves tested three of the four models on the same 845 real 4H CRT setups from EUR/USD, GBP/USD, USD/JPY and gold (mid-May to mid-November 2026). We followed each trade on hourly candles for C3 and C4, with the stop beyond C2's extreme and the target at the opposite side of C1. Retest and midpoint orders were cancelled if unfilled by the end of C3. Fills were judged conservatively: a limit order could not also hit its target in the same hourly candle that filled it, and a candle touching both stop and target counted as a loss. Costs were excluded.
| Entry model | Filled | Winning trades (of filled) | Avg R per filled trade | Avg R per setup (misses = 0) |
|---|---|---|---|---|
| C3 open | 99% | 45% | −0.06 | −0.06 |
| Retest (limit at CRL) | 64% | 27% | −0.07 | −0.05 |
| Midpoint of C2 (limit) | 78% | 36% | −0.09 | −0.07 |
| Lower-timeframe trigger | — | — | — | Not tested (needs 5–15 minute history) |
The results were close to identical. The retest model missed about a third of setups and won less often when it did fill, but its wins were larger, so per setup it ended up almost exactly where the C3-open model did. No model turned an unfiltered CRT pattern into a profitable one.
The lesson here is the opposite of what most entry-model discussions suggest. Refining the entry did not create an edge where the setup itself had none. Entry models change how a result is distributed (more small wins, or fewer bigger ones), but they rarely change the sign of the result on their own.
Do Simple Filters Help?
We also checked whether the grading rules taught in this course improved the C3-open model on the same data.
| Filter | Setups | Winning trades | Avg R per trade |
|---|---|---|---|
| All setups | 845 | 45% | −0.06 |
| In the direction of the 5-day trend | 367 | 47% | −0.05 |
| Against the 5-day trend | 478 | 43% | −0.08 |
| C2 is the 01:00 or 05:00 New York candle | 268 | 46% | −0.03 |
| C2 closes past C1's midpoint | 158 | 61% | −0.07 |
| Reward to target ≥ 1R at C3's open | 493 | 37% | −0.07 |
Each filter moved the numbers in the expected direction, but none of them, used alone, made the pattern profitable. Notice the trade-off in the last two rows. A strong C2 close produces many more winners (61%), but the target is closer, so each win is smaller. Requiring at least 1R does the opposite: fewer winners, bigger wins. The average barely moves.
This is why the course keeps emphasising context that a simple rule cannot capture: higher-timeframe levels, the reason price is at this level now, and what the next liquidity target is. Treat these test results as the baseline your own selection has to beat.
Choosing a Model
- Little screen time: C3 open or limit orders (retest, midpoint), which can be placed in advance.
- Can watch the lower timeframe: LTF triggers.
- Wide C2 wicks: retest or LTF triggers, to avoid very wide stops.
- Strong trend: C3 open, because pullbacks may not come.
Testing Entry Models
A fair comparison
Step 1: Same setups
Collect one set of valid CRT setups.
Step 2: Apply each model
Record entry, stop, fill or miss, and outcome for each model on every setup.
Step 3: Same exits
Keep targets and management identical across models.
Step 4: Compare totals
Expectancy per setup, including missed trades as zero.
Limit Orders and Expiry of the Setup
Retest and midpoint entries usually use limit orders placed right after C2 closes. Decide in advance how long the order stays active. A common rule is to cancel it at the end of C3: if price hasn't returned by then, the setup has moved on without you.
Also decide what happens if price reaches the target before your limit fills. Most traders simply cancel and record the setup as missed. Chasing with a market order after the move has started usually gives the worst price of all and a poor reward-to-risk.
Combining Models
Some traders split the position: half at C3's open to guarantee participation, half on a retest limit to improve the average price. That reduces the cost of missed retests while still capturing part of the better price. If you combine models, test the combination as its own rule rather than switching between models trade by trade.
Practical Example
Hypothetically, Lakshmi tests 40 past 1-hour CRT setups on Bank Nifty with each entry model. C3-open entries fill every time; retest entries fill on about two-thirds; LTF triggers on about half.
When she counts missed trades as zero and compares total results in R, the retest model comes out ahead in her sample, because its better price outweighs the missed trades. She adopts it and continues logging to see whether the result holds in new data.
Common Mistakes
- Switching models depending on mood.
- Ignoring missed trades when comparing.
- Moving limit orders to chase price.
- LTF triggers against the setup direction.
- Entering before C2 closes, which isn't an entry model at all.
Professional Insight
Experienced traders often find that the entry model matters less than consistency and selection. A slightly suboptimal entry, applied the same way every time, produces cleaner data and fewer emotional decisions than a perfect entry chosen after the fact. Choosing one model and recording every result, including misses, is what turns an entry preference into evidence you can genuinely rely on in real live trading.
Risk Considerations
- Limit orders can fill just before a move fails.
- Tight stops are hit by normal noise.
- Fast moves leave limit entries unfilled.
Important Terminology
| Term | Meaning |
|---|---|
| C3 open entry | Entering as soon as C3 begins. |
| Retest entry | Entering on a return to the swept level. |
| Limit order | An order to buy or sell at a set price or better. |
| Fill rate | The share of setups where an entry order is filled. |
| LTF trigger | A lower-timeframe signal that times the entry. |
What is the best CRT entry?
There's no single best entry; each trades price against fill rate. Test them on your market with missed trades counted.
Should I enter at C3's open?
It's the simplest and never misses a move, but usually has the widest stop relative to the target.
What is a retest entry in CRT?
A limit order at or near the swept level, filled if price returns to it during C3.
Are lower-timeframe entries better?
They tighten stops but miss more trades and add complexity.
How do I compare entry models?
Apply each to the same set of setups with identical exits, counting missed trades as zero.
Which CRT entry model performed best in testing?
In our test of 845 real 4H setups, the C3-open, retest and midpoint entries produced almost the same average result per setup, all slightly below zero before costs. The retest filled only 64% of the time but had larger wins when it did. No entry model created an edge on its own.
Do missed trades really count in a comparison?
Yes. A limit-order model that skips a third of setups has to be compared per setup, with misses counted as zero. Comparing only filled trades makes deeper entries look better than they are.
Practical Exercise
Compare models on your market.
Your task
Step 1: Collect thirty setups
Valid CRT on your timeframe.
Step 2: Apply four models
Record fills and results.
Step 3: Total in R
Counting misses as zero.
Step 4: Choose
Adopt one model and keep logging.
Check Your Understanding
Which entry never misses a move?
Related Lessons
Previous: CRT Strategy. Next: CRT Stop-Loss, Targets and Invalidation.