
Stop Placement for Swing Trades
JustWolves is an educational platform and is not a SEBI-registered investment advisor. Trading financial instruments involves significant risk of loss and may not be suitable for all investors. Past performance is not indicative of future results. Read our full disclaimer →
What you'll learn
- A stop belongs where the trade idea is proven wrong, not at a fixed percentage or rupee amount
- Structure stops go beyond the pullback low or the level that defines the setup
- An ATR buffer keeps the stop outside normal daily noise
- If the correct stop is too far, reduce position size; don't move the stop closer
- Stops can be tightened as a trade works, but never widened
In this article · 15 sections
The stop loss is the one part of a swing trade you decide completely in advance. It defines your risk, sets your position size and determines whether a normal pullback will shake you out. Many traders place stops by habit, a round 5% below entry or wherever the loss 'feels' acceptable. This lesson covers how to place stops from the chart instead, how to size around them, and how stops work in practice in Indian markets.
What You Will Learn
- The principle behind stop placement
- Structure, volatility and time stops
- How to add an ATR buffer
- Stop order types and their limits
Before You Start
Read Entry Confirmation and Timing first. Stop-Loss Orders: Where to Place Them and How They Work covers stop losses in general.
The Principle: Where Are You Wrong?
Every setup has a point at which its logic fails. For a pullback in an uptrend, it's a close below the pullback low or the last higher low: at that point, the uptrend's structure is broken. For a breakout, it's price falling back well inside the base. For a reversal, it's a new low below the reversal low.
The stop belongs just beyond that point. A stop placed closer is inside the trade's normal movement and is likely to be hit even when the idea is right. A stop placed further away adds risk without adding information.
Types of Stop
| Type | Where it goes | Best for |
|---|---|---|
| Structure stop | Beyond the pullback low, base low or reversal low | Most swing setups |
| Volatility (ATR) stop | A multiple of ATR, often 1.5–3×, from entry | Stocks without clear nearby structure |
| Time stop | Exit if the trade hasn't moved within a set number of days | Avoiding dead money |
| Fixed percentage | A set % below entry | Rarely ideal; ignores the chart |
Many traders combine them: a structure stop with an ATR buffer, plus a time stop if the trade goes nowhere for, say, ten sessions.
Adding an ATR Buffer
Prices often probe just past obvious lows before reversing, partly because many stops sit there. Placing the stop a fraction of the Average True Range (ATR) beyond the level, commonly 0.25 to 0.5 ATR, keeps it outside that noise.
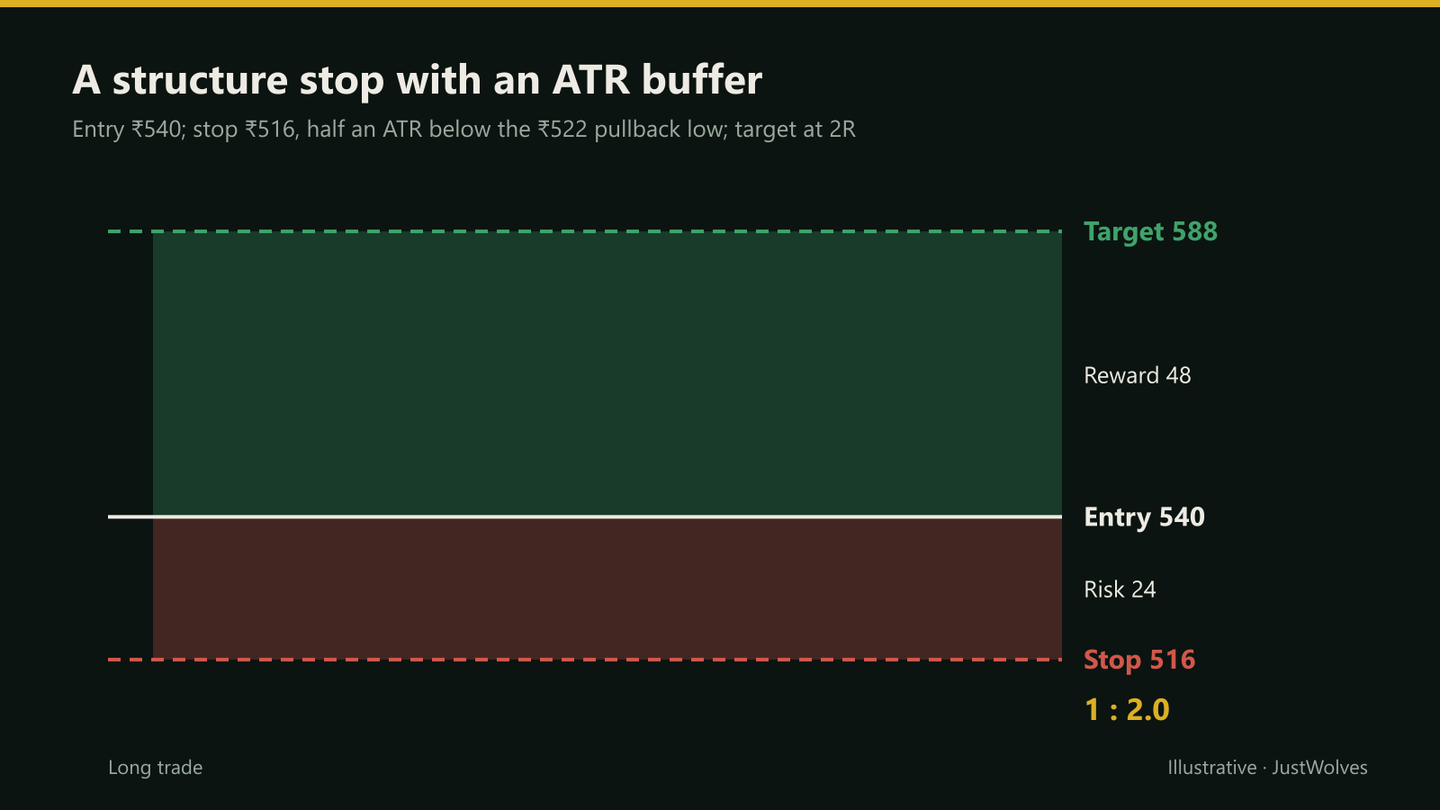
For example, with a pullback low at ₹522 and a 14-day ATR of ₹12, a half-ATR buffer puts the stop at ₹516.
Real Prices: The Same Trade With and Without a Buffer
Rohan's example in this lesson places the stop half an ATR below the pullback low. The chart below shows why on real Mahindra & Mahindra prices from May and June 2025: the same entry with the stop at the low, and with the buffer.
Real prices: the same trade with and without an ATR buffer, Mahindra & Mahindra, May–June 2025
Step 1 of 4
A pullback in an uptrend
In May 2025 Mahindra & Mahindra is in a strong uptrend, well above a rising 50-day average. It pulls back from about ₹3,130 to ₹2,957 on 30 May, near its 20-day EMA. ATR is about ₹71.
- What to observe
- The pullback low is where the trade is wrong.
- Condition
- How far below it should the stop go?
Size From the Stop, Not the Other Way Round
Once the stop is set, position size follows: shares = rupee risk ÷ (entry − stop). If the correct stop is far from entry, the position is smaller; if it's close, larger. This keeps rupee risk constant while letting each stop sit where the chart says it should.
The common error is the reverse: deciding on a quantity first, then placing the stop wherever the loss feels tolerable. That puts stops at arbitrary points inside normal movement. Swing Position Sizing and Portfolio Heat covers sizing in detail.
Stop Orders in Practice
Swing traders in India commonly use stop-loss (SL) or stop-loss market (SL-M) sell orders, or good-till-triggered (GTT) orders that persist across sessions. Order types and their availability vary by broker and segment, so check what yours supports, including whether a GTT stays valid after a corporate action.
A stop order isn't a guaranteed price. If a stock gaps below the stop at the open, the order fills at the next available price, which can be well below the stop. A stop-limit order avoids a bad fill but may not fill at all in a fast fall. Overnight and Gap Risk covers this.
Practical Example
Hypothetically, a consumer stock in an uptrend pulls back to ₹522 and triggers a long entry at ₹540. The 14-day ATR is ₹12. Rohan places his stop at ₹516, half an ATR below the pullback low, risking ₹24 a share.
His account is ₹4,00,000 and he risks 1% per trade, ₹4,000, so he buys 166 shares (₹89,640 in value). He also sets a time stop: if price hasn't made a new high above ₹552 within ten sessions, he'll exit. His first target, at 2R, is ₹588.
How Much Buffer? Our Test
JustWolves took 379 pullback signals on about two years of daily prices for 17 large NSE stocks (November 2024 to November 2026), entered at the close of the signal day with a 2R target, and changed only the stop: at the pullback low, or 0.25, 0.5 or 1 ATR below it. For comparison we added a fixed 3% stop below the entry, the chart-blind method this lesson's mistakes list warns about. Gap fills were taken at the open, as they would be in practice.
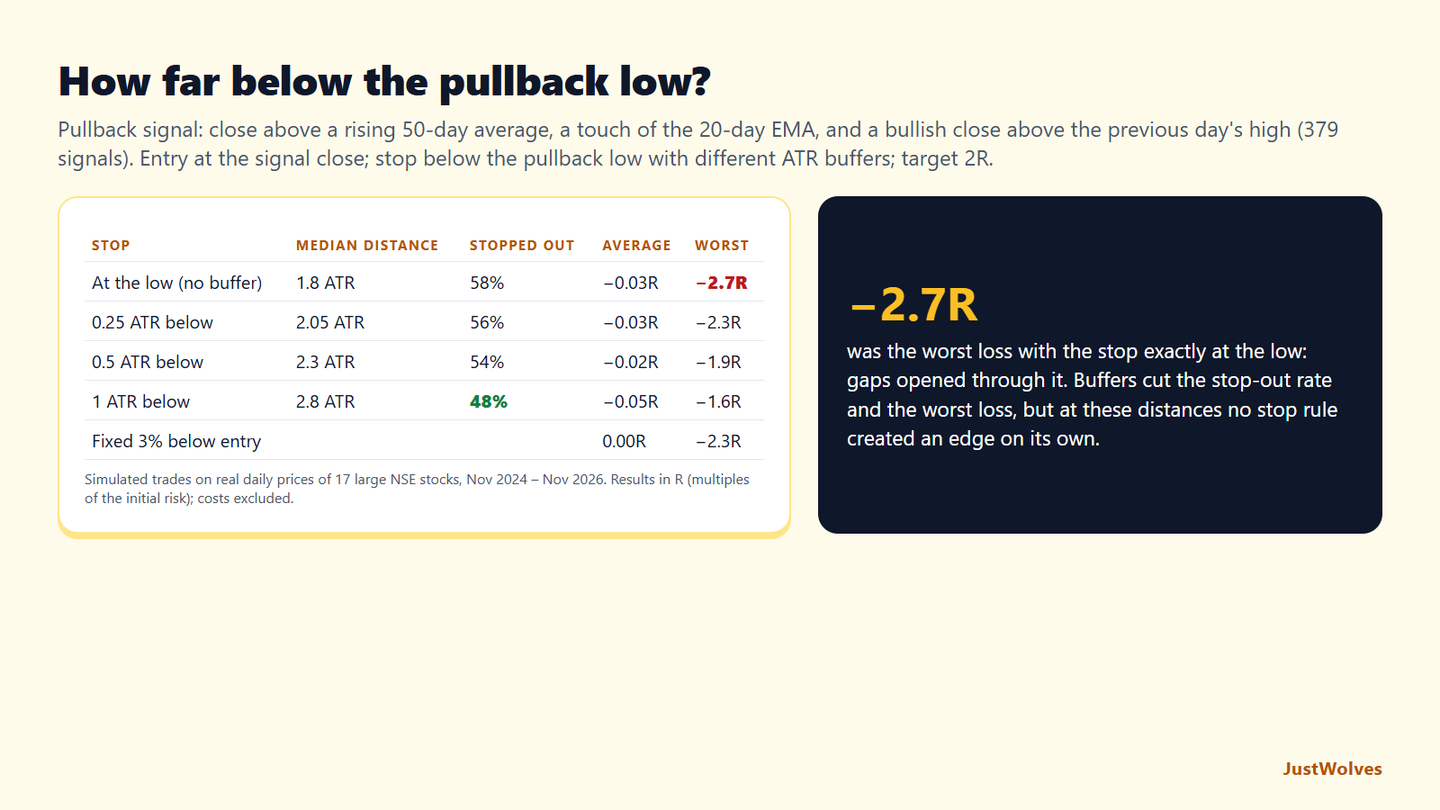
| Stop | Median distance | Stopped out | Average | Worst |
|---|---|---|---|---|
| At the low, no buffer | 1.8 ATR | 58% | −0.03R | −2.7R |
| 0.25 ATR below | 2.05 ATR | 56% | −0.03R | −2.3R |
| 0.5 ATR below | 2.3 ATR | 54% | −0.02R | −1.9R |
| 1 ATR below | 2.8 ATR | 48% | −0.05R | −1.6R |
| Fixed 3% below entry | 0.00R | −2.3R |
Buffers did what this lesson says: fewer stop-outs and smaller worst losses. Moving the stop from the exact low to one ATR below it cut the share of trades stopped out from 58% to 48%, and the worst loss from −2.7R, a gap through a tight stop, to −1.6R. Gaps are why the worst losses exceeded −1R at all: a stop is not a guaranteed price, as this lesson's order section explains.
But no stop distance turned the setup into a winner. Average results stayed close to zero at every buffer, because a wider stop also means a more distant 2R target and a smaller position. The fixed 3% stop did about as well on average as the structure stops, but with larger worst losses, because it sometimes sat inside the day's normal range.
The useful conclusion is about consistency and size. A stop beyond the structure, with a modest buffer, makes each trade's risk honest and limits the damage from probes and gaps. Position size, set from that stop as this lesson's sizing section says, is what keeps the rupee risk constant.
Common Mistakes
- Fixed-percentage stops that ignore the chart.
- Stops exactly at obvious lows, with no buffer.
- Choosing quantity first, then squeezing the stop.
- Widening the stop as price approaches it.
- Mental stops that aren't entered as orders.
Professional Insight
Experienced swing traders often say the stop is where they decide what kind of trader they are. Accepting a correctly placed stop, and the smaller position size that comes with it, is one of the clearest differences between traders who last and those who don't. A trader who can't accept the right stop for a setup shouldn't take that setup.
Risk Considerations
- Gaps can fill stop orders far below the stop price.
- Tight stops inside noise raise the loss rate.
- Order validity varies by broker and after corporate actions.
Important Terminology
| Term | Meaning |
|---|---|
| Structure stop | A stop beyond the swing that defines the setup. |
| ATR | Average True Range, a measure of typical daily movement. |
| Time stop | An exit if a trade doesn't progress within a set period. |
| SL-M order | A stop-loss order that executes at market once triggered. |
| GTT order | Good-till-triggered: stays active across sessions. |
Where should I put my stop loss in swing trading?
Just beyond the level that proves the setup wrong, such as below the pullback low, with a small ATR buffer.
Is a fixed percentage stop good?
It's simple but ignores the chart. Stops based on structure or volatility usually make more sense.
How big should my ATR buffer be?
Commonly 0.25 to 0.5 ATR beyond the level, but test what suits your setups.
What if my stop is too far away?
Reduce position size so rupee risk stays within your limit; don't move the stop closer.
Does a stop-loss order guarantee my exit price?
No. If the stock gaps through it, the order fills at the next available price.
Does an ATR buffer reduce stop-outs?
Yes, in our test. On 379 simulated pullback trades on 17 NSE stocks, moving the stop from the exact pullback low to one ATR below it reduced stop-outs from 58% to 48%, and the worst loss from −2.7R to −1.6R. Average results stayed close to zero.
Why did I lose more than my stop on a swing trade?
Usually because of a gap. A stop order fills at the next available price; if the stock opens below your stop, you lose more than planned. In our test, the worst trade with a stop exactly at the pullback low lost 2.7 times the planned risk.
Practical Exercise
Audit your stops.
Your task
Step 1: Take 20 past trades
Real or paper.
Step 2: Mark the invalidation point
Where was the setup actually wrong?
Step 3: Compare
Was your stop beyond it, at it or inside it?
Step 4: Count
How many stopped-out trades later reached the target?
Check Your Understanding
A stop belongs:
Related Lessons
Previous module: Entry Confirmation and Timing. Next: Targets, Partial Exits and Trailing Stops. See also the Risk Management course.