
Order Blocks: How to Identify Bullish and Bearish Order Blocks
JustWolves is an educational platform and is not a SEBI-registered investment advisor. Trading financial instruments involves significant risk of loss and may not be suitable for all investors. Past performance is not indicative of future results. Read our full disclaimer →
What you'll learn
- An order block is the last opposite-coloured candle before a strong move that breaks structure
- Four common validity rules: the candle swept nearby liquidity, the move left an FVG, the zone is unmitigated, and the move broke structure (after inducement)
- Bullish OB: last down candle before a strong up move; bearish OB: last up candle before a strong down move
- Use the timeframe that matches the level you're trading; lower timeframes produce many false zones
- SMC explains OBs as institutional order zones; you can't verify that, so judge them by tested results
In this article · 16 sections
Order blocks are the zones most associated with Smart Money Concepts. The basic definition is simple: the last opposite candle before a strong move. The problem is that this describes almost every candle before every move. This lesson gives you the definition, four rules that narrow it down, how to choose the right timeframe, and three ways to enter, while being clear about what the concept can and can't tell you.
What You Will Learn
- What an order block is and how SMC explains it
- Four rules for a valid order block
- Bullish vs bearish order blocks and timeframe alignment
- Three entry methods and their trade-offs
Before You Start
Read Filtering High-Quality FVGs and Advanced Inducement first.
What an Order Block Is
A bullish order block is the last down-closing candle before a strong up move that breaks structure. A bearish order block is the last up-closing candle before a strong down move that breaks structure. The zone is usually drawn from that candle's high to its low.
SMC's explanation is that large participants can't fill big orders in one go, so they build positions in a zone and leave orders behind, which price returns to fill. That's a plausible story about how large orders work, but it can't be verified from a retail chart. What you can test is how price behaves when it returns to zones defined by the rules below.
Four Rules for a Valid Order Block
Rule 1: The candle swept liquidity
For a bullish OB, the down candle should trade below the previous candle's low (or a nearby obvious low) before the move up. That sweep is the event SMC treats as a footprint. Without it, many traders don't count the candle.
Rule 2: The move left a fair value gap
The move away from the OB should leave an FVG: a gap between the OB candle's high and a later candle's low (bullish). It shows the move was forceful.
Rule 3: Unmitigated
The zone must not have been revisited since it formed. Once price trades back into it and away, most traders consider it used.
Rule 4: It produced a valid break of structure
The move from the OB should break structure, ideally after an inducement as described in lesson 02.02.05. No valid break, no valid OB.
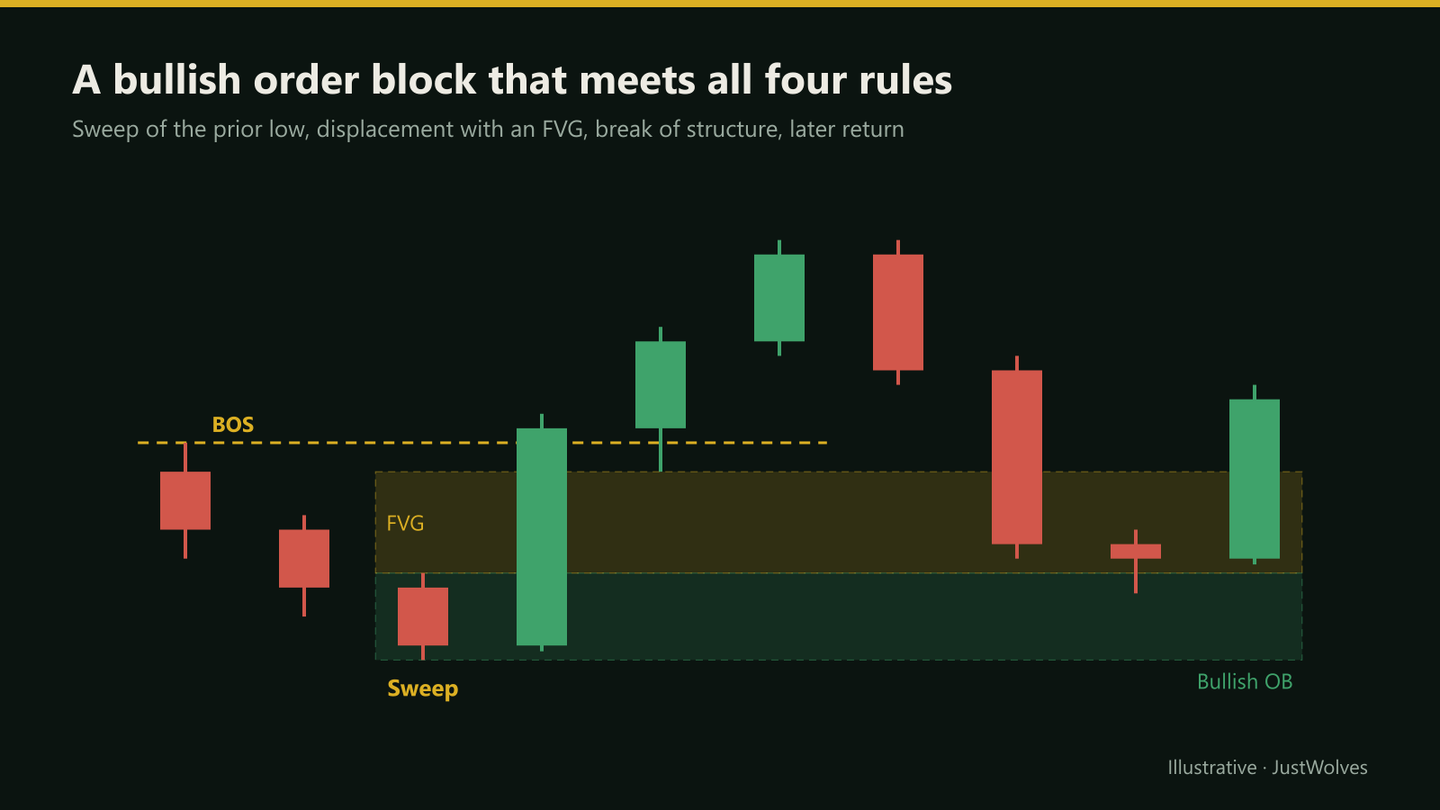
Watch the Four Rules Play Out
The schematic above shows the finished pattern. The interactive chart below builds it candle by candle, so you can see when each rule becomes checkable. Rule 1 is visible as soon as the candidate closes. Rules 2 and 4 need the next two candles. Rule 3 stays true only until price returns. Use the toggles to hide the entry, stop and target and decide for yourself where you would place them.
The four order block rules, one candle at a time
Step 1 of 7
Map the structure first
An order block only means something relative to structure. Here the last swing high is 60.60. A bullish order block needs a move that closes above it.
- What to observe
- The swing high a bullish move must break.
- Condition
- No structure level, no order block.
Bullish vs Bearish
| Bullish OB | Bearish OB | |
|---|---|---|
| Candle | Last down candle before a strong up move | Last up candle before a strong down move |
| Sweep | Below the previous low | Above the previous high |
| Trade | Buy on return to the zone | Sell on return to the zone |
| Stop | Below the OB candle's low | Above the OB candle's high |
The Bearish Mirror Image
Everything flips for a bearish order block. Look for the last up-closing candle that trades above the previous high, followed by a sharp drop that leaves a fair value gap below the candle's low and closes below the last swing low. The zone is the candle's full range. The aggressive entry is a sell limit at its low (the near edge), the stop goes above its high with a buffer, and the target is the sell-side liquidity below the next obvious lows.
Bearish order blocks in stock indices deserve extra care. Indices tend to fall faster than they rise, so a bearish block at a daily resistance can produce very quick moves, but the sharp short-covering rallies that follow sell-offs also run through bearish blocks more readily than you might expect.
Location and Timeframe
Order blocks at significant levels, such as the previous day's or week's high or low, or inside a higher-timeframe FVG, are generally given more weight than those in the middle of a range.
Match the timeframe to the level. A common scheme: for a monthly level, look for the OB on the daily chart; for a weekly level, the 4-hour; for a daily level, the 1-hour. Too low a timeframe produces many zones that price runs through; too high and the move may be over before you can enter.
Three Entry Methods
| Method | Entry | Pros | Cons |
|---|---|---|---|
| Aggressive | Limit at the near edge of the OB | Fills most often | Price may dip deeper first |
| Midpoint | Limit at the OB's 50% level | Better price, balanced | Misses shallow reactions |
| Confirmation | Wait for a lower-timeframe CHoCH or MSS inside the OB | Evidence of a reaction | Worse price, sometimes missed |
In every case, the stop goes beyond the whole OB candle, including its wick, plus a small buffer. Pullbacks deep into the zone are common, so a stop inside the zone is easily hit.
Step by Step: Trading a Bullish OB
Checklist
Step 1: Confirm the higher-timeframe context
Trend or key level supports a long.
Step 2: Find the candidate
Last down candle before the move that broke structure.
Step 3: Apply the four rules
Sweep, FVG, unmitigated, valid BOS.
Step 4: Choose an entry method
Aggressive, midpoint or confirmation.
Step 5: Set stop and target
Stop below the OB low; target the next liquidity, at least 2R.
Practical Example
Hypothetically, on the 1-hour GBP/USD chart at a daily demand area, a down candle from 1.2652 to 1.2631 trades below the previous low, then a strong rally breaks the last high at 1.2690, leaving an FVG at 1.2652–1.2664.
All four rules pass. Kabir uses the midpoint method: buy limit at 1.2642, stop at 1.2626 (below the OB low with a buffer), target the next equal highs at 1.2720. Risk 16 pips, reward 78 pips. Price returns to 1.2639 and he's filled.
Real Example: Gold, 16 October 2026
The worked example above is hypothetical. The one below is not: it uses actual gold futures candles. It was chosen because it passes all four rules, but it also shows three things that schematic diagrams hide. The break of structure arrived one candle later than it first appeared to. The fair value gap was tiny. And the price data itself contains a suspicious print that would distort a backtest.
Real bullish order block: Gold 1H, 15–16 October 2026
Step 1 of 6
Context: a high at 4197.7
Gold rallied to 4197.7 on the evening of 15 October (UTC), then drifted back down through the Asian session. That high is the structure a bullish move needs to close above.
- What to observe
- The swing high, and the slow drift lower toward a low.
- Condition
- Wait for a candidate candle.
Three practical lessons come out of this one chart:
- The close rule protects you. Candle 9 rallied almost exactly to the swing high and closed 0.2 points short. Anyone labelling a BOS on the wick, or on a candle that has not closed, would have been early. Here it did not matter, but often it does.
- Time of day matters. The return into the block came at 09:00 New York time, the hour gold futures see a surge in volume around the US open and US data releases. Order blocks are often tested when a new session brings fresh orders.
- Data quality is part of backtesting. A single bad print on an hourly chart can turn a missed trade into a "win" or a winner into a stop-out. When a backtested fill depends on one isolated wick, verify it on a lower timeframe or treat it as unfilled.
Gold around the 16 October 2026 order block
Loading historical candles…
Backtesting Order Blocks Honestly
Order blocks look excellent in hindsight because the eye picks out the zones that held and skips the ones that failed. A fair test needs rules decided before you look at the outcome:
- Define the candidate mechanically: last opposite-closing candle before the candle that closes beyond structure.
- Apply the four rules as pass or fail, with no "almost".
- Fix the entry method (near edge, midpoint or confirmation) and the stop buffer before you start.
- Record every qualifying zone, including those price never returned to. Missed trades are part of the method's real-world results.
- For any fill that depends on a single wick, check the lower timeframe.
Track at least 50 zones per market and timeframe before drawing conclusions. If you cannot find 50, the timeframe is probably too high for a meaningful sample.
| Field | Why it matters |
|---|---|
| Rules passed (1–4) | Shows whether the filters improve results |
| Time of the return | Session effects are common |
| Fill / no fill | Unfilled zones are a real cost of limit entries |
| Maximum adverse move before target | Tells you whether your stop buffer is right |
| Result in R | Comparable across markets and position sizes |
Common Mistakes
- Marking every candle before a move without the four rules.
- Re-using mitigated OBs.
- Stops inside the zone.
- Wrong timeframe for the level.
- Treating the institutional story as proof.
Professional Insight
Strip away the vocabulary and an order block is a precise way of drawing the base of a strong move, the same area classical traders call demand or supply. The rules make it consistent and testable. Lesson 02.03.07 compares the two directly.
Risk Considerations
- Valid OBs fail, especially against the higher-timeframe trend.
- Deep retracements test stops placed too tightly.
- Unfilled limits mean missed trades.
Important Terminology
| Term | Meaning |
|---|---|
| Order block (OB) | The last opposite candle before a strong move that breaks structure. |
| Bullish / bearish OB | Last down / up candle before a strong up / down move. |
| Mitigated | Already revisited by price. |
| Timeframe alignment | Matching the OB's timeframe to the level being traded. |
| CSD order block | A term some material uses for a single decisive candle at a key level where direction changed. |
What is an order block?
The last opposite-coloured candle before a strong move that breaks structure, used as a zone price may react to on its return.
What makes an order block valid?
Common rules: it swept nearby liquidity, the move left an FVG, it's unmitigated, and the move produced a valid break of structure.
Where do I put my stop on an order block trade?
Beyond the whole order block candle, including its wick, plus a small buffer.
Which timeframe should I use for order blocks?
One matched to the level you're trading, for example 1-hour OBs for daily levels.
Do order blocks show where banks placed orders?
That's SMC's explanation, but it can't be verified from a retail chart. Judge OBs by how they perform in your testing.
Should I draw an order block over the wick or only the body?
Both conventions exist. Drawing the full range, wicks included, keeps the sweep wick inside the zone and puts the stop beyond it. Drawing only the body gives a tighter zone and stop but gets run through more often. Choose one and test it consistently.
What is the difference between an order block and a fair value gap?
The order block is the last opposite candle before the move. The fair value gap is the empty space the move left behind it. They often sit next to each other, and price frequently reacts at the gap before reaching the block.
Do order blocks work on gold and indices?
The same rules can be applied to any liquid market, and the real example on this page uses gold futures. Gold and indices tend to have larger wicks and deeper retests than major forex pairs, so stop buffers usually need to be wider. Test each market separately.
Why did my backtest order block trade fill when the live trade did not?
Historical data can contain isolated bad prints, and different feeds show slightly different highs and lows. Check fills that depend on a single wick on a lower timeframe or on your broker's own data.
Practical Exercise
Validate 20 order blocks.
Your task
Step 1: Find candidates
20 last-opposite candles before structure breaks.
Step 2: Apply the four rules
Mark pass or fail on each.
Step 3: Track returns
Did price return, and did it reach 2R before the stop?
Step 4: Compare
Four-rule OBs vs the rest, in your sample.
Check Your Understanding
A bullish order block is:
Related Lessons
Previous: Filtering High-Quality FVGs. Next: Breaker Blocks and Mitigation Blocks. See also Advanced Inducement.