
SMC Trade Setups: Entry, Stop-Loss and Take-Profit Planning
JustWolves is an educational platform and is not a SEBI-registered investment advisor. Trading financial instruments involves significant risk of loss and may not be suitable for all investors. Past performance is not indicative of future results. Read our full disclaimer →
What you'll learn
- Two common SMC setups: reversal after a sweep and CHoCH, and continuation after a BOS
- Entries come from a lower-timeframe FVG or order block after confirmation, usually with a limit order
- The stop goes beyond the level that invalidates the idea, not at an arbitrary distance
- Targets come from liquidity: internal levels for partials, the draw on liquidity for the final target
- Size every trade from the stop so a loss costs a fixed share of the account
In this article · 17 sections
Everything in this course comes together in a trade plan: where you'll enter, where you're wrong, where you'll take profit and how much you'll risk. This lesson sets out two common SMC setups, the decisions inside each one, and a written checklist you can use before every trade. It ends with a fully worked example.
What You Will Learn
- Two core SMC setups: reversal and continuation
- Entry options and when to use each
- How to place stops and choose targets using structure and liquidity
- How to size the position and write the plan
Before You Start
Read Multi-Timeframe SMC Analysis and Position Sizing and the 1% Rule first.
Setup 1: Reversal After a Sweep
Bearish example
Step 1: Context
Price reaches a higher-timeframe supply zone or premium POI.
Step 2: Sweep
It trades above an obvious high or equal highs and closes back below.
Step 3: Shift
A lower-timeframe CHoCH or MSS with displacement breaks the last higher low.
Step 4: Entry
Sell limit in the FVG or order block left by the displacement.
Step 5: Risk
Stop above the sweep high; target sell-side liquidity below.
The Reversal Setup, End to End
The chart below walks through the complete reversal setup in this lesson, including the position-size calculation, so you can see every part of the plan in order.
A complete reversal setup: entry, stop, two targets and size
Step 1 of 5
The sweep at a premium zone
With a bearish 4H bias, price rallies into a 1H premium supply zone during London and sweeps the session high (1.2718) to 1.2724, then closes back below it.
- What to observe
- Liquidity taken at the planned location.
- Condition
- Wait for the shift.
Setup 2: Continuation After a BOS
Bullish example
Step 1: Context
Higher-timeframe structure is bullish; price has just made a BOS.
Step 2: Pullback
Wait for price to retrace into discount of the new leg.
Step 3: POI
An unmitigated FVG or order block from the move that broke structure.
Step 4: Trigger
A lower-timeframe bullish shift inside the POI.
Step 5: Risk
Stop below the POI or the pullback low; target the next buy-side liquidity.
Entry Options
| Entry | How | Trade-off |
|---|---|---|
| Limit at the zone edge | Order at the near edge of the FVG/OB | Fills often; stop furthest away |
| Limit at 50% | Order at the FVG's midpoint or the OB's mean threshold | Better price; sometimes missed |
| Market on confirmation | Enter when the lower-timeframe shift completes | Certain fill; worst price, slippage |
Many traders choose one method per setup and stick with it, so that their results reflect the setup rather than inconsistent entries.
Stop Placement
- Beyond the invalidation level: the sweep extreme for reversals, the POI or pullback low for continuations.
- Add a buffer for the spread and normal noise: a few pips on majors on lower timeframes.
- Not at obvious levels: a stop exactly at equal lows is where liquidity sits (lesson 02.02.01).
- Never widened after entry.
Targets
- First target: the nearest internal liquidity: a recent swing, an internal high or low, or the opposite edge of the session range. Many traders take partial profit here.
- Final target: the higher-timeframe draw on liquidity.
- Minimum reward: check before entering that the first or final target gives at least your minimum, such as 2R.
Position Size
Use the formula from lesson 01.02.04: lots = money at risk ÷ (stop in pips × pip value per standard lot). Size from the actual stop distance, round down, and check your total exposure if you already hold trades in correlated pairs.
A Complete Example
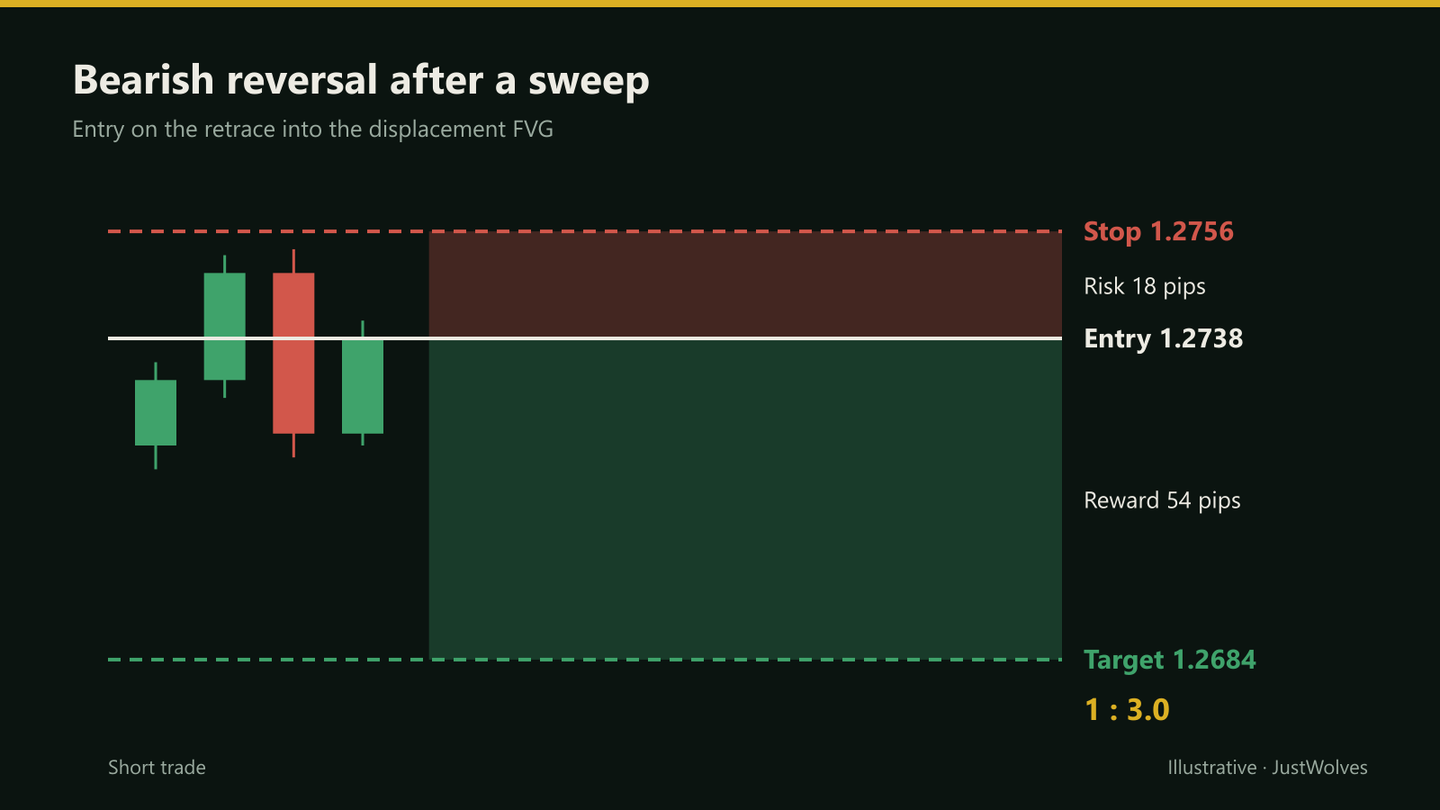
Context. Hypothetically, GBP/USD's 4-hour structure has just made a bearish CHoCH, and price rallies into a 1-hour premium supply zone during London. The draw on liquidity is the previous day's low at 1.2684.
Sweep and shift. On the 5-minute chart, price trades above equal highs at 1.2750, reaches 1.2753, then drops through the last higher low with displacement, leaving an FVG at 1.2734–1.2741.
Plan. Sell limit at 1.2738; stop at 1.2756 (above the sweep high plus a 3-pip buffer); first target the session low at 1.2710 (1.6R) for half the position; final target 1.2684 (3R). Sanjay's account is $8,000 and he risks 1%: $80 ÷ (18 × $10) = 0.44 lots.
Management. After the first target, he moves the stop to breakeven. Whatever the outcome, he journals the trade with screenshots and whether each checklist item was met.
How the Reversal Setup Performed on Real Data
JustWolves tested a mechanical version of the reversal setup on about six months of real 1H candles for EUR/USD, GBP/USD, USD/JPY and gold. Rules: price sweeps the previous 24 hours' high or low; within six candles, a candle closes through the high (or low) of the five candles before the sweep and leaves a fair value gap; a limit order at the gap's midpoint; stop beyond the sweep; target 2R. We then split the trades by whether they were with or against the 4H trend. Costs were excluded.
| Trade direction | Filled trades | Winning trades | Average per trade |
|---|---|---|---|
| With the 4H trend | 16 | 63% | +0.55R |
| Against the 4H trend | 73 | 49% | +0.14R |
| No clear 4H trend | 14 | 43% | +0.04R |
The reversal setup was positive on average in every group, and best with the 4H trend. That matches the related ICT 2022 model test, the only model in our ICT tests with a positive average. It also matches this course's emphasis on location and bias: most of these setups fired against the 4H trend, and those did worse.
The numbers are small: sixteen trend-aligned trades is far too few to trust the +0.55R figure. What the test supports is the structure of this lesson: a defined sweep, a confirmed shift with displacement, a planned entry and stop, and fixed targets. Combine it with the multi-timeframe bias from the previous lesson, and log your own trades to build a sample large enough to judge.
The Pre-Trade Checklist
All must be yes
Step 1: Bias
Is the higher-timeframe direction clear, and is this trade with it?
Step 2: Location
Is price at a POI in the correct half of the range?
Step 3: Confirmation
Has the lower-timeframe sweep and shift happened?
Step 4: Room
Does the target give at least 2R with no major level in the way?
Step 5: Risk
Is the size calculated from the stop, and is total exposure within limits?
Common Mistakes
- Entering before confirmation because the zone 'should' hold.
- Stops at obvious levels or inside the zone.
- Targets with no liquidity logic.
- Sizing by feel instead of from the stop.
- Changing the plan mid-trade.
Professional Insight
A written plan turns SMC from a way of describing charts into a strategy you can measure. Write the five checklist answers before every trade; after 50 trades, your journal will show which conditions actually matter for your results, and which you can drop.
Risk Considerations
- Tight lower-timeframe stops are hit more often; expect a lower win rate.
- News can override any setup; check the calendar first.
- Partial exits change your expectancy; test your management rules too.
Important Terminology
| Term | Meaning |
|---|---|
| Reversal setup | A trade against the prior move after a sweep and shift. |
| Continuation setup | A trade with the trend after a BOS and pullback. |
| Invalidation level | The price that proves the trade idea wrong. |
| Partial profit | Closing part of the position at a first target. |
| Mean threshold | The 50% level of an order block. |
What is the best SMC entry?
There's no single best one. Common choices are a limit order in the FVG or order block left by a lower-timeframe shift, after confirmation.
Where should I put my stop in SMC?
Beyond the level that invalidates the idea, such as the sweep extreme, with a buffer, and not at obvious liquidity.
How do I choose SMC targets?
Use liquidity: nearby internal highs or lows for partials and the higher-timeframe draw on liquidity for the final target.
What risk–reward should I aim for?
Many SMC traders require at least 2R. Check it before entering, not after.
How much should I risk per SMC trade?
Typically 0.5–1% of the account, with the position sized from the stop distance.
Is the SMC reversal setup profitable?
In our mechanical test on six months of real 1H data, the sweep-plus-MSS reversal setup averaged a small positive result with a 2R target, and did best in the direction of the 4H trend (+0.55R over only 16 trades). Samples were small, so test it on your own market.
How do I calculate position size for an SMC trade?
Divide the money you are willing to risk by the stop distance multiplied by the pip value. For example, $100 risk with a 27-pip stop and $10 per pip per standard lot gives about 0.37 lots.
Practical Exercise
Plan three trades on paper.
Your task
Step 1: Find setups
One reversal and two continuations on past charts.
Step 2: Write the plans
Entry method, stop, first and final targets, size for a $5,000 account at 1%.
Step 3: Score the checklist
Bias, location, confirmation, room, risk.
Step 4: Play them forward
Record the result in R for each.
Check Your Understanding
A reversal setup typically follows:
Related Lessons
Previous: Multi-Timeframe SMC Analysis. Next: When SMC Setups Fail. See also Stop-Loss Orders.